This site uses advanced css techniques
A customer with a Windows Storage Server with a 500G RAID1 array wanted to replace the drives with a pair of 2TB units, and it turns out that this can be done without an intermediate backup to external media. We did this three times with great success.
BUT — you must highly comfortable with all aspects of your system, because it should be obvious that mistakes can be painful. Be careful, and don't reach beyond your grasp. Pay particular attention to the caveats listed — doing this on the wrong kind of RAID controller might not work the same way.
Parameters:
The one-sentence description: we'll replace one existing drive with a newer big one, allow the RAID controller to rebuild the array (which is effectively a highspeed copy), repeat with the second large drive, delete the virtual disk in the RAID controller BIOS, create a new Virtual Disk (also in the BIOS, a step which leaves the existing data undisturbed), boot into the OS, and use a repartitioning tool to expand into the larger space.
Whew. Now in more detail.
Before starting, be sure you have the local Administrator password for this machine in case a problem happens down the road. A domain Administrator password may not be good enough, depending on the failure. Know the password!
After purchasing a pair of identical SATA drives, we rebooted the system to get into the RAID BIOS - this involves watching for the time to type control-R. This brings up the PERC 6/i Integrated BIOS Configuration Utility, and the first tab at the top is VD Mgmt (Virtual Disk Management).
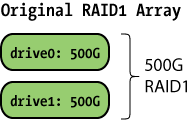
Navigating Controller 0 » Disk Group 0 » Virtual Disks » Virtual Disk 0, the upper right will show RAID Level 1, Status of Optimal, and the size of the array. Be sure that the array is in good condition before doing anything.
The array is configured as:
Now, pull drive zero (only!) out about one inch, which disconnects it and allows it to spin down. The RAID status will change to Degraded, which is expected — it thinks a drive just went bad.
Once the drive has spun down, pull it all the way out, remove the four screws capturing the drive, as well as the small adapter board (if present), and mount the new drive in its place. Be sure to label the old drive: "Removed from STORAGE1, SLOT 0, 2010/01/29" or the like. This still contains valid data, and we have to keep track of it in case anything goes awry.
Insert the new, larger drive into slot 0, and the RAID controller will start rebuilding immediately, and this can be seen by navigating to the Physical Disks section. Drive zero shows a progress bar, and these particular 7200 RPM drives took about 2 hours 15 minutes to do a full copy.
When it finishes, the array goes to Optimal status: repeat the process with the second drive in slot 1, again waiting for the rebuild to complete. Be sure to label the old drive1 as well!
Once both rebuilds are done, the old drives are no longer needed: put them aside.
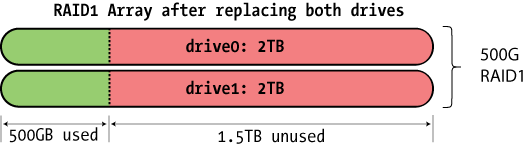
Though the RAID1 array is optimal with the pair of 2TB drives, it's still only using 500G of each one, with the trailing 1.5TB of each drive unused. The array looks like:
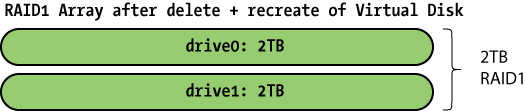
The RAID firmware does not allow us to directly extend an array, but we can accomplish the same thing indirectly, by deleting (yes, deleting!) Virtual Disk 0 and then recreating it. As long as it's a RAID1 volume and you do not initialize the array, it will just use the existing data found there.
Steps to accomplish:
Back at the Virtual Disk Management screen, navigate to the Virtual Disk 0 item and note the setup on the right side: It should say RAID1, optimal status, with the new larger size taking up the whole drive:
At this point, the RAID volume has been expanded, and the underlying disk volume as seen by the operating system has been as well, but the NTFS partitions remain the same size they were before, leaving unallocated space at the end of the drive. This can be seen in the Disk Management applet.

At this point you can do one of three things to make use of the unallocated space:
Server 2003 and Server 2008 both contain a DISKPART tool, which can extend an NTFS volume to use the rest of the space. This is not a full-featured partitioning tool, as it can only extend a partition into unallocated space that lies just beyond it. However, this is exactly the scenario we have here.
Our goal is to expand the existing D: partition into the much-larger unallocated space just to the right. Note that if we wanted to enlarge the C: partition, we'd have to use a third-party tool to do this.
Using diskpart is straightforward from the CMD prompt: we'll list the volumes to locate thex D: partition (here, volume #1), select it, extend it, and then we're done!
C> diskpart

Microsoft DiskPart version 5.2.3790.3959
Copyright (C) 1999-2001 Microsoft Corporation.
On computer: MYSERVER

DISKPART> list volume

  Volume ###  Ltr  Label        Fs     Type        Size     Status     Info
  ----------  ---  -----------  -----  ----------  -------  ---------  --------
  Volume 0     C   OS           NTFS   Partition     40 GB  Healthy    System
  Volume 1     D   DATAPART1    NTFS   Partition    425 GB  Healthy
  Volume 2     E                       DVD-ROM         0 B  Healthy

DISKPART> select volume 1

Volume 1 is the selected volume.

DISKPART> extend

DiskPart successfully extended the volume.

DISKPART> list volume

  Volume ###  Ltr  Label        Fs     Type        Size     Status     Info
  ----------  ---  -----------  -----  ----------  -------  ---------  --------
  Volume 0     C   OS           NTFS   Partition     40 GB  Healthy    System
* Volume 1     D   DATAPART1    NTFS   Partition   1945 GB  Healthy
  Volume 2     E                       DVD-ROM         0 B  Healthy

DISKPART>
Voilà: no reboot required!
We've had nothing but good luck with this procedure, but it seems prudent to offer some thoughts in case things go badly.
First, the original drive first removed from the machine has a full copy of the whole system, so it's a good fallback position if something doesn't go right.
We suspect that the fallback action would be:
These two drives should be "in sync" with respect to the drive data, but it's likely that the controller will start a consistency check or rebuild anyway, using one of them as the master. Not sure there's a way to avoid this.
Here, or doing the original expansion process, it's possible that the controller may not immediately join the drive into the array and start rebuilding: this is likely because it think that the drive is part of some other array, and leaves it alone as a precaution.
In this case, the controller may instead attach it as a hot spare, which requires that you associate it with the array. It's straightforward to navigate the menus to do this, after which it will rebuild the array.
In case of utter disaster, all these drives contain a full copy of the data, and they can be recovered with a Linux Live CD, where one can mount the drive and copy the data to other media, such as an external USB hard drive. Alternately, the drive itself can be moved to another machine and the data rescued from it.
By doing both rebuilds while in the BIOS guarantees that all four drives have the same, identical OS data. THis might matter during recovery scenarios.
![[Steve's Email]](/images/steve-email.gif)