This site uses advanced css techniques
A customer recently purchased a Mitel phone system with IP phones, and though there was no VoIP external to our network, we still had to do a fair amount of work to get the phones to play well internally. Mitel had no resources at all for how to do this, so I'm memorializing this to help the next guy. It's likely that this will be somewhat applicable to other phone vendors.
This is the paper that Mitel should have been giving their customers.
Update (2015/07): The customer's environment was a Mitel 5000 phone system (which supports both IP and digital phones), and one of the actual IP phones is model 5320.
Most IP phones are designed to use Power over Ethernet (PoE), which means that power is supplied by the network switch in the computer room rather than by a power brick plugged into the wall near the phone itself. This helps keep the user's desk a lot neater by eliminating one of the power sources.
In addition, rather than require a separate network cable for the phone alongside the cable for the user's computer, most IP phones have a tiny built-in network switch that rides a single network cable to the computer room and supplies a network connection to the PC plugged in behind it. This saves the enterprise from an intrusive and potentially costly rewiring project.
Surprisingly (to me, at least), the phones even support the notion of putting the phone on one VLAN and the PC behind it on another, allowing for a segregation of the network. Apparently this is a common feature.
Selection Tip: the phones themselves don't need a speedy network connection, so Fast Ethernet (100 megabit) is plenty fast, but the device behind the phone might need more. But considering that GigE phones and the GigE switches they plug into are both substantially more expensive than FastE versions, it may well be that your office users can live with FastE to their desktop. Ours could.
Our intention was to keep the office PCs on VLAN1 while putting the phones (and phone system) on VLAN4. This took some doing.
As noted, Power over Ethernet goes a long way to making the user's desktop area neater than it otherwise would be, as it largely avoids a power brick (aka "wall wart") among the other clutter. But there are lots of options here, including quite a few ways to make a mistake.
As one would expect, there are many ways to integrate these phones into a larger network, with the "easiest" being to configure them with a static IP on the same subnet as the rest of the network, as this avoids having to deal with DHCP or VLANs, but we really wanted to do it properly. Unfortunately, we found that Mitel had very few resources for us so we had to navigate this almost entirely on our own.
Our network had two subnets of interest:
We used our internet firewall to route between the two subnets, though others may use a layer3 switch for this purpose. Though the phone traffic itself doesn't need to travel between the two networks, the phone-control application on the user's PC will need to talk to the phone system.
After creating the VLAN, insure that each switchport used for the phone is set to a tagged (aka trunked) interface, because untagged traffic will default to the switch's native VLAN (which for us is VLAN1). Instructions for Cisco devices look like:
interface FastEthernet0/7
 description Mike's phone
 switchport mode trunk
We're mostly a Windows shop so we used the Microsoft DHCP server on the domain controller for this purpose. This is not only convenient, but it provides tight integration with DNS (which we care about).
These steps detail how to create a second DHCP scope as well as the DHCP options that support the phones:
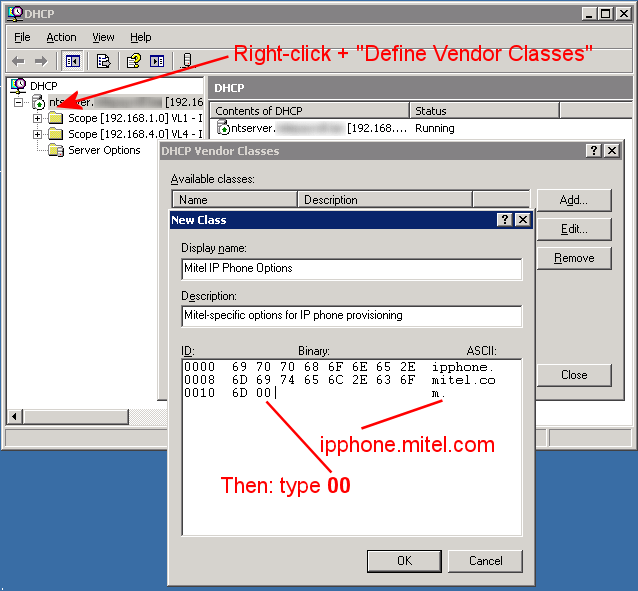
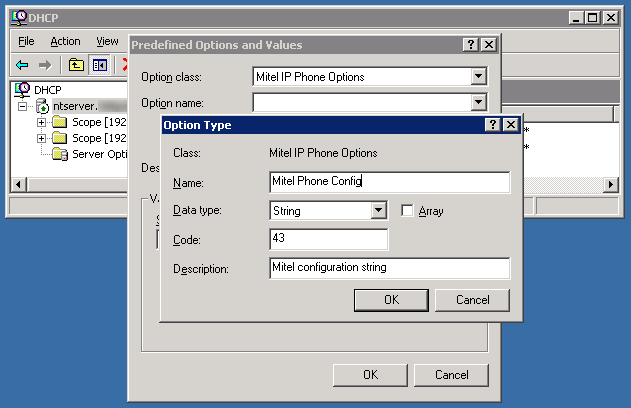
id:ipphone.mitel.com;sw_tftp=192.168.4.41;call_srv=192.168.4.41;vlan=4;l2p=6;dscp=56This string includes IP address of the phone system (once for the TFTP server that provides firmware and configuration, and again for the call control server), the VLAN the phone should be on (4), and a few other parameters that should be entered literally. Your IPs may vary.
At this point, the DHCP server should be prepared to offer the special Mitel options to any Mitel phone that asks for an address, no matter which subnet it asks on.
There are a number of ways to configure DHCP, and we chose to configure our DHCP server (which is also our domain controller) with a separate network connection directly in VLAN#4 (with an IP address of 192.168.4.7) — this allowed it to hear DHCP broadcasts directly on VLAN4 as well as allowing it to serve DNS and other requests directly without having to rely on the firewall to route to the main office subnet.
But it's possible to configure a DHCP server with a single NIC to serve up requests for multiple subnets, including those it can't talk to directly, by the use of DHCP relay (sometimes known as a DHCP Helper or a UDP helper).
This is configured in the firewall/router by telling it: if you hear a DHCP request on this separate subnet, forward it to the main DHCP server at this IP, and add your remote subnet IP to the packet in the Relay Address slot.
When the DHCP server gets the packet, it knows that it wasn't broadcast - it's coming from the inside address of the firewall - but it uses the DHCP relay address inside the packet to select a scope and send the reply.
It's a clever system that I nevertheless couldn't get to work, and since I had a
NIC to spare, probably won't revisit it. But other environments probably should.
DHCP relay started to work when I insured that all phone switchports to be in trunk mode; it's not clear why this needs to be, but it made the difference for DHCP relay mode.
These are the steps that the phones take to boot, and the fact that it requests a DHCP address twice was the final piece of the puzzle to allow us to understand this. It was very, very frustrating trying to figure this out.
As far as we know, the only way to avoid the phone making two DHCP requests per boot is to configure it with a static IP directly on VLAN4, but we preferred the features of automatic provisioning from DHCP.
This Tech Tips was created strictly to document on particular experience on one particular customer's network, but it seems likely that Mitel is not the only phone system that works this way. As we learn of other configurations that work in a similar way, we'll document them here.
Blogged here.
First published: 2012-05-15
![[Steve's Email]](/images/steve-email.gif)