
Many users have implemented Secure Shell (ssh) to provide protected
access to a remote Linux system, but don't realize that by allowing
password authentication, they are still open to brute-force attacks
from anywhere on the internet. There are worms running rampant on
the internet which do an effective job finding weak username/password
combinations, and these are not stopped by the use of Secure Shell.
This Tech Tip details how to use the free PuTTY SSH client to
connect to a Linux system running the OpenSSH server, all while
using public key encryption and SSH agent support.
Much of this information applies to any OpenSSH installation on
any UNIX system - Solaris, *BSD, OpenServer - but we've targetted
this to the Linux platform when specifics are called for.
Installation and simple config/login
Providing for full passwordless, agent-based access requires a lot
of steps, so we'll approach this in steps by first providing for
regular passworded access to the system. This allows for testing of
the initial installation and the ability to login before enabling
the more advanced features.
- Download and install the programs
- Unlike most Windows programs, the PuTTY suite does not require an
installer: the individual .EXE files are simply dropped into a
directory where they are run directly. We admire the economy and
style which PuTTY's author demonstrates.
-
The files can be dropped into any directory which is in the user's
command path, and we normally use C:\BIN (see the next item for
how configure this).
-
Five files should be downloaded from the
PuTTY site:
- PuTTY.exe — Secure Shell client
- PuTTYgen.exe — SSH public/private key generator
- Pagent.exe — SSH key agent
- PSCP.exe — Secure Copy from command line
- PSFTP.exe — Secure Copy with FTP-like interface
- Insure the installation directory is in the command path
-
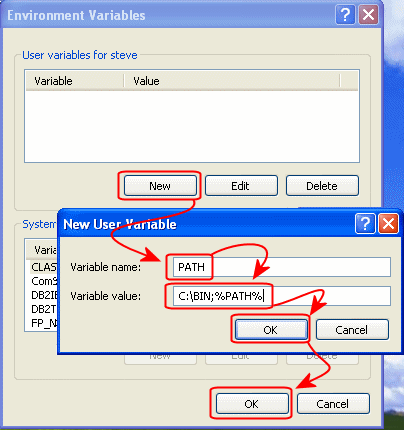 Though it's possible to run PuTTY with a full path or shortcut,
in practice it's helpful when it's fully available at the CMD
prompt to access or copy files from anywhere in the filesystem.
-
Right-click on My Computer on the desktop and select Properties.
Click the Advanced tab at the top, then click the
Environment Variables button. This brings up the dialog
box shown on the right.
-
There is always PATH variable in the "System Variables"
section, and sometimes in the "User Variables" section as well.
Only administrators have access to System Variables, so Edit
or Add the PATH as required.
-
We typically put the new directory at the start of the path,
and it's separated from the rest of the list with a semicolon.
Click OK to save all the changes.
- Create a shortcut on the desktop
-
 PuTTY is often used heavily by an IT worker, so it's helpful to have
a shortcut on the desktop to make for easy access. To add this,
right-click on the desktop and click New + Shortcut.
Either Browse to, or type in the name of, the path of the PuTTY
executable. In our example, it's been C:\bin\putty.exe.
Click OK and give the shortcut a convenient name.
- Launch PuTTY and configure for the target system
-
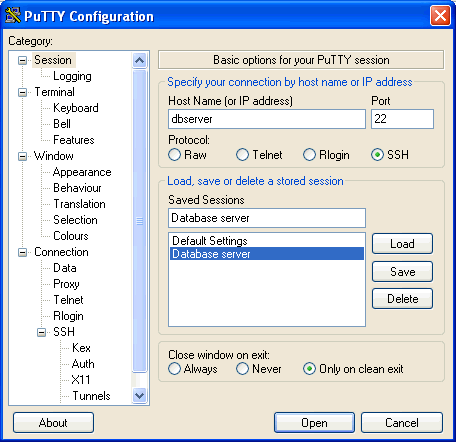 Launch PuTTY via the shortcut, and it will display the configuration
dialog box: there are many options here. We'll fill in several
to provide for passworded access to the system, then configure for
public-key access later.
-
- Category:
- Hostname: dbserver
- Protocol: (*) SSH
- Connection : Data
- Auto-login username: steve
- Connection : SSH
- Preferred SSH Protocol Version: (*) 2 Only
-
Once these simple settings have been entered, they can be saved
to make for easy access next time. Click Session on the
left, then enter a name in Saved Sessions - this name will
usually be related to the machine you're connecting to. Click
Save to store these settings in the Registry: we've chosen
the name Database server.
- Login!
- With the saved settings from the previous step, we'd like to use
them to connect to the target system. Launch PuTTY (if not already
open), and in the Session section, click on the name of the
saved session and click Load. Click Open to launch
the connection.
-
-
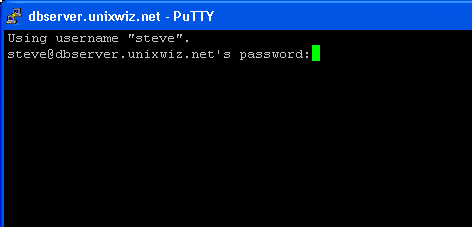
When prompted, enter the password for your account on the
remote system, and if correct, you'll receive a shell. Now
you may begin working on the system.
-
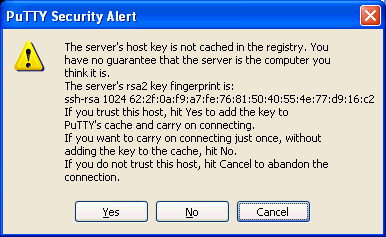 However - every time PuTTY connects with a server, it exchanges
identification in the form of host keys. If the host key is unknown,
or doesn't match what we've seen previously, it warns the user. For
unknown hosts, this is mostly a pro forma operation, but for
previously-known systems it may suggest that the host is not the same
one as originally connected.
-
Host keys which have changed without warning can occur when the target
operating system is reinstalled without restoring the host keys from
backup, or it could be something more nefarious such as a rogue host
masquerading as the genuine one.
-
One should always inquire into unexpectedly-changed host keys
Creating and using multiple sessions
When the user only needs to connect with one system, it's possible
to program in these parameters into the Default Session, but it's
much more common to access multiple systems. With a bit of setup,
we can easily create and connect to these systems with one click.
- Create and save the sessions
-
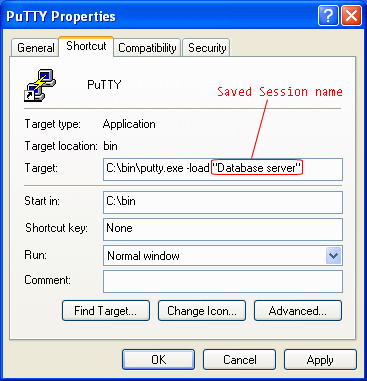 As we did in the previous section, create and save as many
named sessions as needed, and make a note of the session names.
These names can be referenced on the command line with the
-load parameter, and can be embedded into the shortcut.
-
Right-click on the shortcut and select Properties, then enter
the parameter -load along with the name of the session
(in quotes, if necessary). Click OK to save the shortcut
properties.
-
 It's also a good idea to rename the shortcut to reflect the name
of the server it's connecting to: right-click on the shortcut
and select Rename.
-
Once the session shortcut is fully configured, double-clicking
the icon launches the connection. Create as many pre-programmed
shortcuts as needed.
Create and install a public/private keypair
The real power of Secure Shell comes into play when public/private
keys are used. Unlike password authentication, public key access
is done by performing a one-time creation of a pair of very long
binary numbers which are mathematically related.
The initial configuration step is moderately involved, but need
be done only once: once created, the key can be easily installed
on as many remote systems as desired.
-
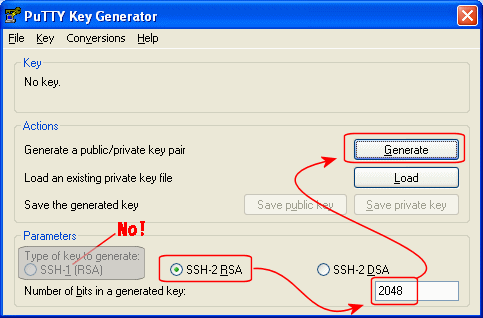 Run PuTTYgen
-
A pair of public/private keys — small files containing very
large binary numbers — is required, and PuTTYgen does this.
It's run just one time to create a personal pair of keys, which are
then installed wherever needed.
-
Click Start, then Run, then enter
puttygen in the command-line box. This displays
the main dialog box, shown on the right. Select the
key parameters as shown, then click Generate.
-
Because the DSA keysize is fixed at 1024 bits, and the RSA keysize
can be made much larger, we recommend a 2048 bit RSA key. Note that
the default is 1024 bits, you have to manually override to select
2048.
-
Note: Do not create an SSH version 1 key of any kind:
they're not secure.
-
You'll be prompted to create some randomness by moving the mouse around:
this gives the system some additional entropy which helps create better
keys. This takes just a few seconds to fully generate the keypair.
-
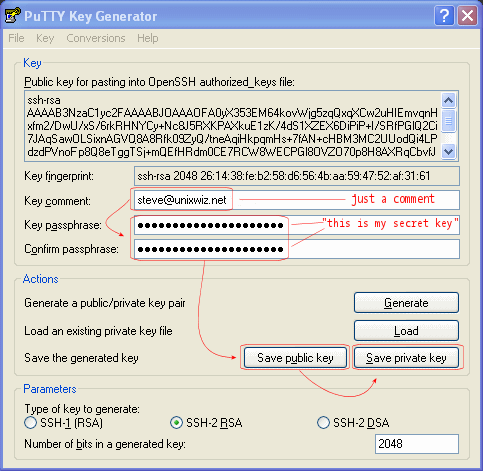 Protect and save the keys
-
Now the keypair has been generated, but exists only in PuTTYgen's
memory: it has to be saved to disk to be of any use. Though the
public key contains no sensitive information and will be installed
on remote systems, the private key must be protected vigorously:
anyone knowing the private key has full run of all remote systems.
-
The private key is typically protected with a passphrase, and this
phrase is entered twice in the fields indicated. The comment is
optional but is customarily the email address of the key owner.
It could also just be the owner's name.
-
Do not forget the passphrase; the keypair is useless without it.
-
The key generated must now be saved, and this is done in three parts:
Save Public Key and Save Private Key both prompt for
a filename, and the private key (with .ppk extension) should
be saved in a safe place.
-
The public key is in a standard format and can be used directly
or indirectly by other software, and it looks like this:
-
---- BEGIN SSH2 PUBLIC KEY ----
Comment: "steve@unixwiz.net"
AAAAB3NzaC1yc2EAAAABJQAAAQEA0yX353EM64kovWjg5zqQxqXCw2uHIEmvqnHx
fm2/DwU/xS/6rkRHNYCy+Nc8J5RXKPAXkuE1zK/4dS1XZEX6DiPiP+I/SRfPGlQ2
Ci7JAqSawOLSixnAGVO8A8Rfk09ZyQ/tneAqiHkpqmHs+7fAN+cHBM3MC2UUodQi
4LPdzdPVnoHp8Q8eTggTSj+mUEfHRdm0CE7RCW8WECPGl8OVZO70p8H8AXRqCbvf
JutYE5yTe9fkzzivMMB7yvZNCRRafRbKsMRSlukPvBihJ0ApdtE/5sbIn36IpMAi
5QNCvWCmIDPKZmjNilY+krO4lTaYu2f9luBWS8f03zOE/rcwyQ==
---- END SSH2 PUBLIC KEY ----
-
The private key is in a PuTTY-specific format which can't be used
by any other software. It won't ever be looked at directly by
the operator.
- Install public key on Linux system
-
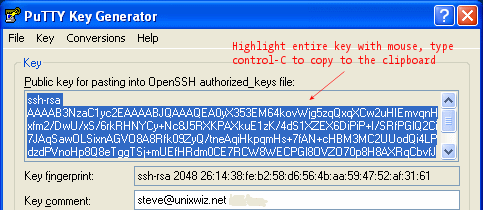 With puttygen still open, highlight the entire "Public Key for
pasting into OpenSSH authorized_keys file" area and type control-C to
copy to the local system's clipboard. This is essentially the same data
as found in the saved public-key file, but it's in a form which can
be directly used on the Linux system.
-
Login to the Linux computer using the account's password, create
the .ssh directory if necessary, then edit the file
.ssh/authorized_keys. This will be a text file, and the
clipboard should be pasted into it.
-
The public key will be just one long line, and it's really easy
to paste the data in a way which truncates the first few characters.
This renders the key inoperable, so be sure that the key begins
ssh-rsa or ssh-dsa. Save the file.
-

-
Insure that both the .ssh directory and the files within it
are readable only by the current user (this is a security precaution),
and this can be achieved using the chmod command with parameters
applying to the entire directory:
$ mkdir $HOME/.ssh

$ chmod -R og= $HOME/.ssh
Log out of the system.
-
Note - the authorized_keys file must be owned
by the user and unreadable/unwritable by anybody else - the OpenSSH
server will deny logins if this is not the case. One can check this
with the ls command:
$ ls -lR $HOME/.ssh
/home/steve/.ssh:
total 16
drwx------    2 steve    steve        4096 Nov 22 13:11 ./
drwx------    6 steve    steve        4096 Nov 22 16:10 ../
-rw-------    1 steve    steve        1150 Nov 22 13:11 authorized_keys
The file must be mode -rw-------.
- Attach the private key to the SSH session
-
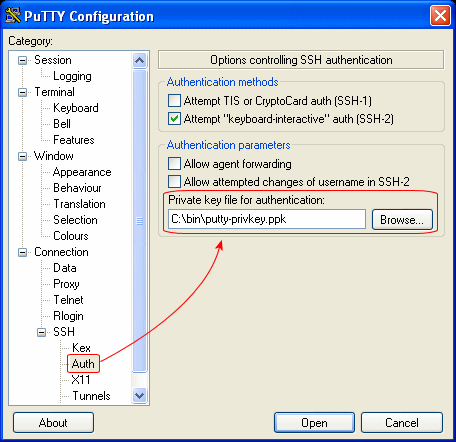 Now that the public/private keypair has been created,
it can be associated with an SSH session. First, we'll
do this in PuTTY by launching the program and loading
the session of interest.
-
Navigate to Connection : SSH : Auth in
the Category pane on the left,
then populate the Private key file for authentication
field by browsing to the .ppk file saved previously.
-
Note - With other Secure Shell clients, we've seen the
ability to attach a private key to all sessions (as part
of a global configuration), but with PuTTY it appears to require
configuration for each session. We're not sure why.
-
Return to the Session category level and save the
current session.
-
At this point, PuTTY (on Windows) and OpenSSH (on Linux) are
both configured for secure, public-key access.
Connect via the public key
Now that the configuration steps have been completed, we're ready
to actually login using the public key mechanism, completely
avoiding the password step.
- Connect securely
- Launch PuTTY with options to load the saved session with the
private key:
-

-
Rather than prompt for the account's password (which will differ on
every remote system), it's instead asking for the passphrase which
is protecting the local private key. When the private key fits into
the public key on the OpenSSH server, access granted and a shell
presented to the user.
-
It's important to note that though the user must type a secret word
when logging in, the passphrase is associated with the local private
key, not the remote account. Even if the user's public key is
installed on 1,000 different remote servers, the same private-key
passphrase is demanded for all of them. This greatly simplifies
the task of remembering access credentials and encourages the
choosing of strong, secure ones.
Disabling password authentication on OpenSSH
Once the user's public and private keypair are verified as correct,
it's possible to disable password authentication on the Linux server
entirely. This entirely forestalls all possible password-guessing
attempts and dramatically secures a machine.
However, for machines not physically local, it's wise to defer on
disabling password authentication until it's absolutely clear
that the keyed access is working properly, especially if multiple
users are involved. Once password authentication has been disabled,
even the root password won't allow one into the system.
Those new to public key access are encouraged to test very carefully.
The configuration of the SSH Daemon is found in the sshd_config
file, often stored in the /etc/ssh/ directory. This is a text
file which is relatively easy to read; we'll be looking for two entries
to modify.
First is to set PasswordAuthentication to the value no.
This may be explicitly set to yes, or it may be commented out
to rely on the default, but we wish to explicitly disable this:
Second, we wish to disable SSH protocol version 1: this is old, has
several substantial security weaknesses, and should not be allowed from
the outside world.
Edit the configuration file and ensure that the two keyword entries are
set properly; comment out the old entries if necessary.
/etc/ssh/sshd_config
# Protocol 1,2
Protocol 2
PasswordAuthentication no
Once the configuration file has been saved, the Secure Shell daemon
must be restarted; on most platforms this can be done with the
"service" mechanism:
# service sshd restart
This kills the listening daemon and restarts it, but does not
terminate any existing individual user sessions. Those who feel
this might be a risky step are invited to simply reboot the
machine.
At this point, OpenSSH will no longer accept passwords of any kind,
with access granted only for users with pre-established
public keys.
Enabling SSH Agent Support
Up to this point, we've provided a large manner of security of system
access, but it's still not terribly convenient: we still must type
a (hopefully) complex pass phrase each time. This can get tedious
when large numbers of systems are involved.
Fortunately, the SSH suite provides a wonderful mechanism for unlocking
the private key once, and allowing individual ssh connections to piggyback
on it without querying for the passphrase every time.
- Launch the agent
-
Navigate to and launch the pageant.exe program from the same
location as the other PuTTY-related files, and it will put itself
into the system tray (in the lower right near the clock).
-
 Double-click the icon in the tray, and it launches a dialog box
with an empty list of keys. Click Add Key and navigate to
the .ppk file which contains your private key. When prompted
for the passphrase, enter it and click OK. Click Close to
dismiss the agent.
-
Now, launch one of the already-configured SSH sessions to a
pubkey-secured remote host: it will query the agent for the
private key, exchange it with the remote, and grant access without
further user intervention.
-
Note - the thoughtful reader may wonder just how the agent
stores the data, and whether untrusted programs are able to obtain
this secret key surreptitiously. We're not sure how it works, but
we've not ever heard of real security concerns on this front. We'll
update this document if we learn something.
- Preload the private key
-
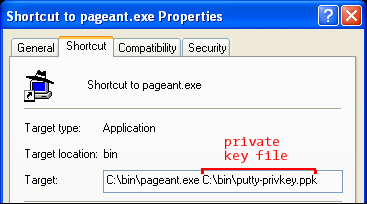 The first thing that many PuTTY users do when logging into the system
for the day is to launch the agent and add the private key. This is just
a few steps, but we can optimize it just a bit more. If we launch the
agent with the private key file as a parameter, it loads the key
automatically.
-
Navigate to pageant.exe and right-click to copy this icon. Paste
this as a shortcut on the desktop, then right-click and select Properties.
Enter the full path of the .ppk private key file as the parameter,
then save the changes.
-
Double-clicking this icon will load the keyfile, demanding the
passphrase. Once entered, that's the last time it's needed as
long as the agent sticks around.
There is very little not to like about SSH agent support.
Agent Forwarding
But we've not exhausted the benefits of SSH agent support.
It's a clear win to avoid typing the passphrase every time
a new connection is launched, but SSH also provides Agent Forwarding
which can pass the credential down the connection to the remote server.
This credential can then be passed to yet another server where the
user's public key has been installed, obviating passwords or the
secret passphrase for the entire duration of a network navigation.
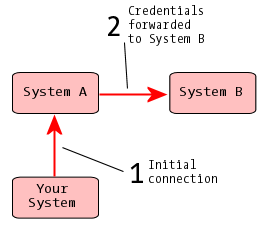
- User launches a connection to Server A: PuTTY on the local
machine gets the private key from the agent and provides it to
the remote server.
-
Remote server processes the public and private key data and
grants access. The user is given a shell on the local system.
-
User attempts to connect to SystemB with ssh -A systemb
(-A enables agent forwarding), and it connects to the
SSH server there.
-
System B asks system A for the user's private key data, and the SSH server
on system A in turn forwards this back to the original workstation where
the agent is queried.
-
The local agent passes the data back up the connection, where it's
forwarded from SystemA to SystemB. SystemB receives this credential,
and access is granted by comparing to the public key stored on that
machine for that user.
This happens automatically and quickly: it takes no more than a
second or two for the entire exchange to occur, and this forwarding
can go over quite a long chain of SSH connections. This provides
for transparent, secure access to a wide range of remote systems.
Note - All of this requires that the user have an account on
each machine in question, and that the user's public key is installed
properly on each one. SSH forwarding doesn't provide any access which
would not be granted absent forwarding; it just adds a more convenient
mechanism to what's already provided.
-
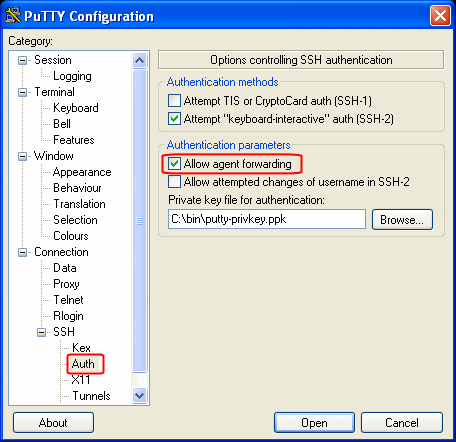 Enable Forwarding in PuTTY
-
Enabling agent forwarding is done in the PuTTY configuration dialogs
much like all the rest, and just one additional box need to be checked.
-
This option requires, of course, the use of pageant on the local
system - without an agent, there's nothing to forward.
-
Should a key-protected connection be attempted with no agent present,
PuTTY will simply prompt for the passphrase as it has all along (and
will do so on each connection).
- Enable Forwarding on the Server
-
In the example above, we saw that the user typed ssh -A host,
but it's common to make "Use agent forwarding" the default setting
to remove the need to type the "-A".
-
The OpenSSH server configuration is found in sshd_config,
while the client configuration is in ssh_config (typically
in the /etc/ssh/ directory). The file can be edited and the
ForwardAgent setting set to yes:
-
/etc/ssh/ssh_config
...
ForwardAgent yes
...
-
This setting doesn't affect the server, so it requires no reboot
or special operation for it to take effect: the next outbound
connection will enable forwarding automatically. This change need
be made only once (and it's the default on some systems).
Note: much more background on this can be found
elsewhere on this server:
Unixwiz.net Tech Tip:
An Illustrated Guide to SSH Agent Forwarding
Copying files securely
 With the configuration of PuTTY, public key access, and agent support
(with forwarding), we're prepared to step beyond terminal shell access
and move files around. Secure Shell provides multiple methods for
copying files from one machine to another, all working together
with the same keys and agents.
PSCP allows for command-line copying of files to and from
a remote SSH server, and PSFTP provides an FTP-like interface
for convenient file transfer. We'll discuss both.
- PSFTP - an FTP-like client
-
The PSFTP program can be launched from the command line or
from a desktop shortcut, and in both cases accepts either a hostname
or a saved session name.
-
When launched, it connects to the target server (fully taking
advantage of public keys and the local agent, if any), and
presents a psftp> prompt:
-
C> psftp dbserver
Using username "steve".
Remote working directory is /home/steve
psftp>
-
Regular users of command-line FTP clients will find this
familiar, though it's certainly not up to the ease of use as
popular GUI clients. The help command may provide some
guidance.
- PSCP - Secure Copy
-
Users at the command line may wish to copy files directly,
and this is done with pscp, the Secure Copy command.
Just like copying regular files on the local filesystem,
pscp takes a machine name and directory as a source
or destination.
-
pscp can transfer one file at a time, or a whole set in a single
instance:
-
C> pscp *.gbk dbserver:/db/evolution
CL_100.gbk       |      97 kB |  97.4 kB/s | ETA: 00:00:00 | 100%
CL_101.gbk       |      68 kB |  68.2 kB/s | ETA: 00:00:00 | 100%
CL_103.gbk       |      44 kB |  44.5 kB/s | ETA: 00:00:00 | 100%
CL_110.gbk       |      34 kB |  34.6 kB/s | ETA: 00:00:00 | 100%
CL_123.gbk       |      45 kB |  45.4 kB/s | ETA: 00:00:00 | 100%
Curiously, the saved session name need not be provided; just the
hostname and the current username (which is usually taken automatically
from the environment. It appears that psftp and pscp
both consult the saved-session list, find an appropriate match, and
then use the access information associated. This makes for a smooth
file-transfer experience.
Security Concerns and the Finer Points
This Tech Tip has intended to provide a fast path to setting up
a Secure Shell environment from workstation to server, but it has
skipped over many of the finer points. The whole point of using
Secure Shell is "Security", and we'd be remiss if we didn't touch
on some of these points here.
We'll make the broader point that one must take care when
working on an untrusted system: when using advanced features
such as agent forwarding or private keys, one is at the mercy
of a hostile operator. Kernel-based keyloggers and Trojaned
/bin/ssh binaries are just a few of many obvious risks
when operating in that kind of environment.
Here we'll touch on a few of the non-obvious points and note
that in a trusted and controlled environment, these issues
simply don't arise.
- Protect your private key
- Though the public key is of only minor concern, the private
key must be protected vigorously. Anyone who can get to the decrypted
private key (either by learning the passphrase, or brute-forcing it)
has full run of all networks where the public key is installed.
We strongly recommend limiting dramatically the number of places
where the private key is kept.
-
We presume that applications exist which can take a private-key file
and attempt to brute-force the key, though we've not yet run across
one.
- Agent use requires trusted machines
- Whenever an SSH key agent is present, whether it be on the local
machine which initiates the outgoing connection, or on intermediate
machines which are forwarding them, it's technically possible for
interlopers on those machines to get access to the secure channel.
-
In OpenSSH, an ssh client communicates with the agent via
a UNIX domain socket under the /tmp/ directory( a
representative file is /tmp/ssh-DeB10132/agent.10132), and
it's restricted to the local user. But superusers also have access
to the socket, and it's relatively straightforward to hijack
the agent to connect to the same target machine.
Related Resources
Published: 2005/11/23
![[Steve Friedl Logo]](/images/unixwiz-logo-140x80.gif)

 Though it's possible to run PuTTY with a full path or shortcut,
in practice it's helpful when it's fully available at the CMD
prompt to access or copy files from anywhere in the filesystem.
 PuTTY is often used heavily by an IT worker, so it's helpful to have
a shortcut on the desktop to make for easy access. To add this,
right-click on the desktop and click New + Shortcut.
Either Browse to, or type in the name of, the path of the PuTTY
executable. In our example, it's been C:\bin\putty.exe.
Click OK and give the shortcut a convenient name.
 Launch PuTTY via the shortcut, and it will display the configuration
dialog box: there are many options here. We'll fill in several
to provide for passworded access to the system, then configure for
public-key access later.

 However - every time PuTTY connects with a server, it exchanges
identification in the form of host keys. If the host key is unknown,
or doesn't match what we've seen previously, it warns the user. For
unknown hosts, this is mostly a pro forma operation, but for
previously-known systems it may suggest that the host is not the same
one as originally connected.
 As we did in the previous section, create and save as many
named sessions as needed, and make a note of the session names.
These names can be referenced on the command line with the
-load parameter, and can be embedded into the shortcut.
 It's also a good idea to rename the shortcut to reflect the name
of the server it's connecting to: right-click on the shortcut
and select Rename.
 Run PuTTYgen
  Protect and save the keys
 With puttygen still open, highlight the entire "Public Key for
pasting into OpenSSH authorized_keys file" area and type control-C to
copy to the local system's clipboard. This is essentially the same data
as found in the saved public-key file, but it's in a form which can
be directly used on the Linux system.

 Now that the public/private keypair has been created,
it can be associated with an SSH session. First, we'll
do this in PuTTY by launching the program and loading
the session of interest.

 Double-click the icon in the tray, and it launches a dialog box
with an empty list of keys. Click Add Key and navigate to
the .ppk file which contains your private key. When prompted
for the passphrase, enter it and click OK. Click Close to
dismiss the agent.
 The first thing that many PuTTY users do when logging into the system
for the day is to launch the agent and add the private key. This is just
a few steps, but we can optimize it just a bit more. If we launch the
agent with the private key file as a parameter, it loads the key
automatically.

 Enable Forwarding in PuTTY
  With the configuration of PuTTY, public key access, and agent support
(with forwarding), we're prepared to step beyond terminal shell access
and move files around. Secure Shell provides multiple methods for
copying files from one machine to another, all working together
with the same keys and agents.