![[Steve Friedl Logo]](/images/unixwiz-logo-140x80.gif)
This site uses advanced css techniques
The Evolution™ payroll service-bureau software from Asure Software is updated regularly to fix bugs and to reflect changes in tax/HR law, and these updates must be applied by Evolution licensees as needed. Patches are released several times a month.
Notice of a new release is sent to the evolution-announce mailing list, and the updates themselves are posted on the support website (Asure-provided credentials required) for download. This document describes the procedure for applying these updates.
We'll note that this is not the only way to perform this task, but it's a process we've been refining for years, and has worked quite well.
Furthermore, this is only for the routine updates: we're not touching on the much more substantial major version upgrades that involve DB patching. You'll need to get help for that.
Bureaus on the AWS cloud environment need not worry about this, as updates are done for you automatically by Asure.
Each release includes at least one, but usually two kinds of files:
The files are found on the support site under a directory named for the release: as of this writing, the current directory is Evolution_v23/.
Actually installing any kind of update requires bringing down Evolution, but there's some work that can be done in advance to get ready for the update, work that does not impact production.
NOTE: though it's technically possible to do the Evo MC parts of this upgrade from your desktop and not the Request Broker machine, I recommend that you do everything from the RB machine to avoid confusion, at least until these updates are routine for you.
Using the Evo Mgmt Console, login and navigate to Maintenance → Version Update, and see where the version you want is found. If you see it at the top, section, it's already been downloaded and this part is done.
But if it's in the bottom section, it's not here yet so you'll need to download it. Click the radio button for the version you want, then [Download Selected Version]. After confirmation, it will start downloading.
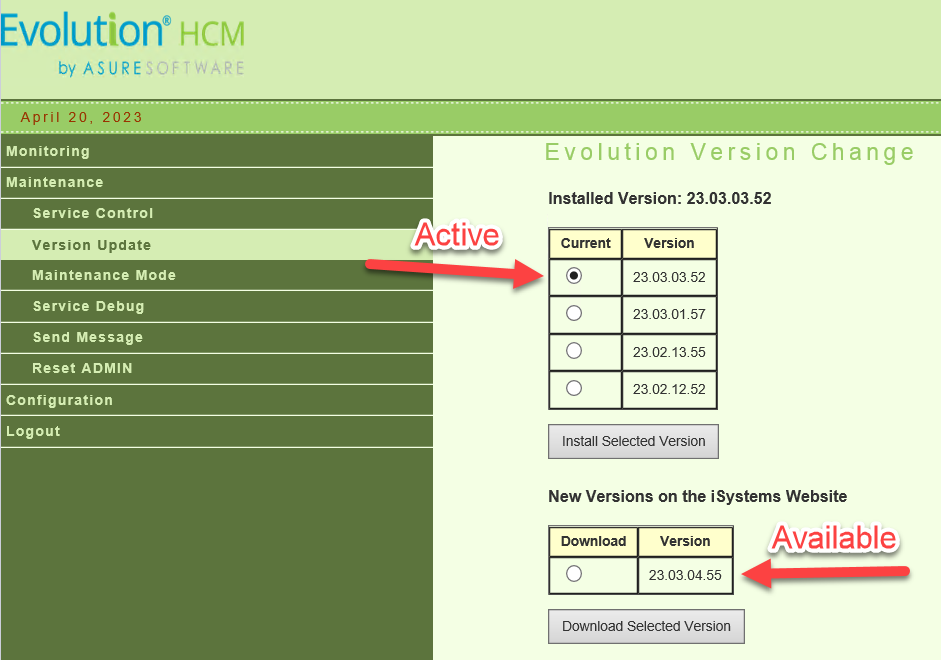
This could take a while, even 5-10 minutes depending on the speed of your internet connection: just wait it out.
When done, it will show the version you just downloaded in the upper section as available but not selected; it will be installed later.
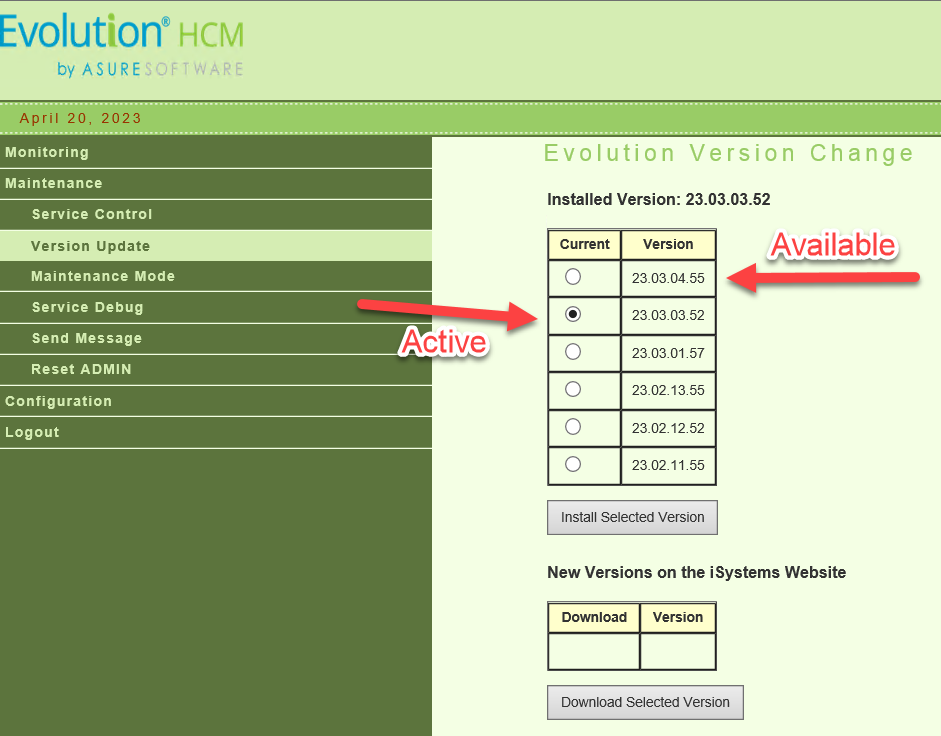
As noted, every update includes one of these, so it will be a common operation.
While on the Request Broker machine, use your browser to visit the support download site. Hopefully it's in a shortcut, and you'll use your credentials to navigate to the current major version area (v23, v24, etc.) and then to the specific release version you're looking for.
There are a number of files in each directory, but the only ones we care about are those whose name starts with "system_". Most have only one, but a single application release can have multiple SYSTEM databases:
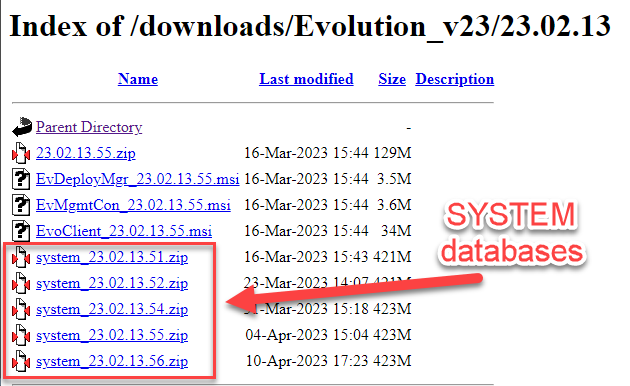
You usually want the most recent SYSTEM database, but you should always consult the release announcement and release notes to find what's in each one.
In any case, to download one, sight-click on the system_* file you want, then select "Save target as..." or "Save link as..." (depending on your browser) - the idea is that you choose where the file is saved rather than just going into your Downloads folder.
Most of my customers have an Evolution Updates area on the Request Broker machine, usually available as a shortcut on the desktop. Navigate to there, then to the directory for this release ("v23", etc.), then save the file there.
Once the downloads have finished, we have to unpack the ZIP file to extract the file within.
No matter what the name of the System_x.x.x.x.zip file is, the file inside the archive is always SYSTEM.gbk, and this must be extracted to the same directory, overwriting any file that already exists.
As with downloading, there are many ways to extract files from a ZIP archive, and you can always use what you're comfortable with, but most of my customers use the native tools available with Windows (i.e., with no third-party add-ons).
Right-click on the System_x.x.x.x.zip file and select (depending on your operating system) "Open in new window" or "Explore". This should open a new window: using your mouse, drag the SYSTEM.gbk from that new window back to the original window. It will likely ask you to confirm overwriting the file; approve, then close the new window.
This marks the end of the prep work, all which can be done while Evolution is running.
Applying any kind of update brings down Evolution, so you may want to check that users are not interrupted in the middle of critical operations unless this is an emergency update that can't wait.
Most Evolution service bureaus do not provide advance customer notice of downtime for updating, because the procedure doesn't take very long and is very low risk. This is unlike the major version upgrades, which put Evolution out of service for hours at a time, and warrants an announced maintenance window.
Even though it's easy to tell when payroll staff has all checked out, there still may be customers online via Evolution Remote. Customers often work at odd hours, especially the evening before due-tomorrow payrolls.
To find out, visit the Evolution Management Console with the web browser and navigate to:
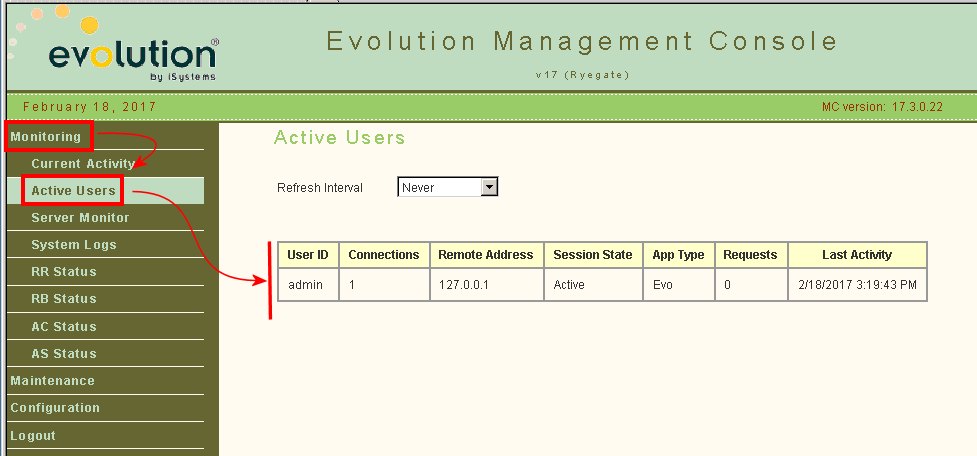
This shows all users logged in, and the last-active-time column showing user last-active time; this makes it possible to tell if your customers are actively working on the system.
Note that users identified as "guest" can generally be disregarded: they are associated either with the system's ADR replication process, or with connections from the Evolution web tier (Employee Portal / Evolution Payroll / Advanced HR); these have no mechanism to notify them, so can they be ignored.
We'll note that the EMC has no way to boot an individual user session, nor to kill sessions which are actually dead, but it's possible to send a Maintenance Notice to all connected users.
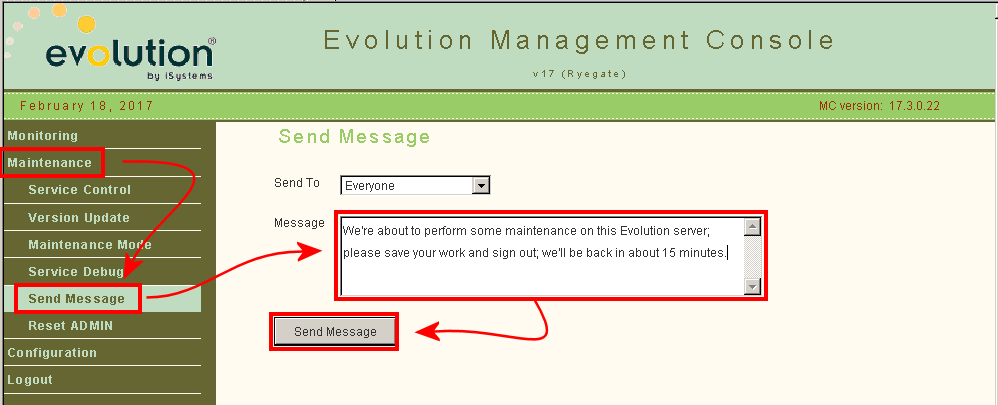
A reasonable time before shutdown, enter a message in the box and click Send. All users will receive this message, and as a helpful side effect, this will automatically log out some dead sessions, leaving only "real" users behind.
Once zero hour arrives, stop all services, bringing Evolution down.
This Evo Tip assumes you have experience starting and stopping services via the Evo Mgmt Console, so coverage here will be cursory.
Navigate to Maintenance → Service Control, and look for the "All Services" buttons in the upper left of the right panel: click [Stop].
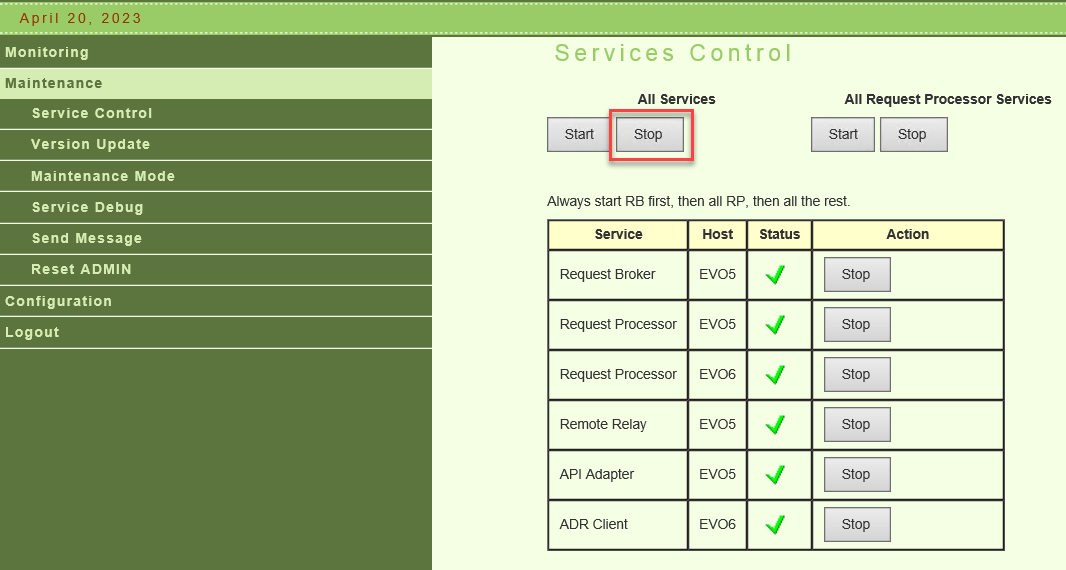
At this point, Evolution is down and we normally like to move this process along to minimize downtime to the users.
If this update includes an application version, it should be applied now. Navigate in the Evo Mgmt Console to Maintenance → Version Update, click the radio button for the version you want, then click [Install Selected Version].
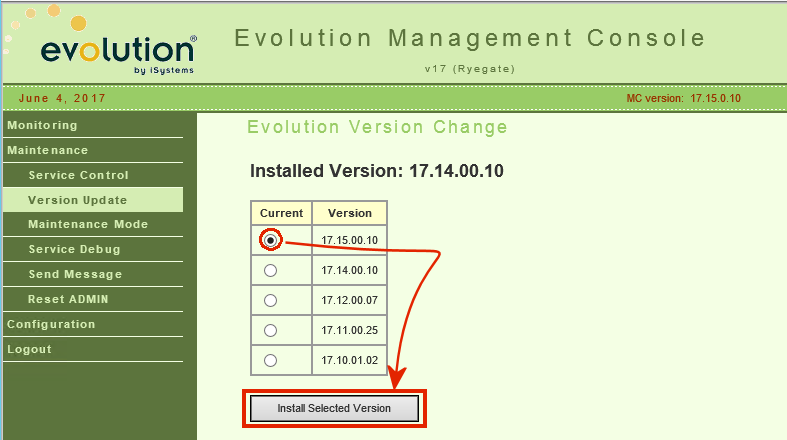
It takes perhaps a minute to activate this version, after which it will show the version that's installed.
There are a number of ways to install the applicable SYSTEM database, including by the use of the Evo Db Maintenance tool, we prefer my own clickrestore mechanism that I've been using for years. This is already installed on most of my customer system.
Still in the same Evo Updates\Ryegate folder, right-click on the SYSTEM.gbk file and select "Evolution: Update LIVE" (or TEST, if you have a test system) from the context menu.i
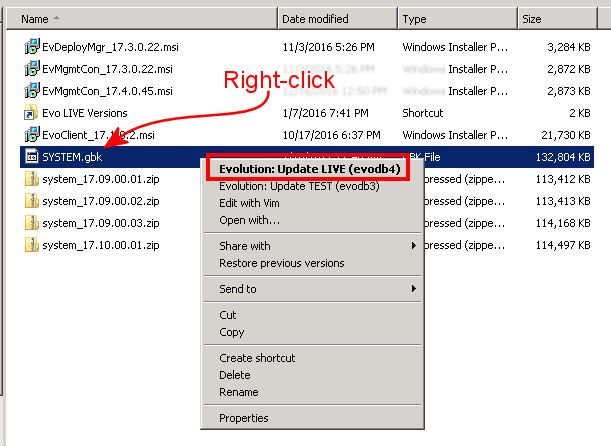
It will open a black-background console window, show what it's about to do, and ask you to press any key to make it so.
Press RETURN to start the update process, and a few minutes later it should finish with an exit status and the version it just updated you to.
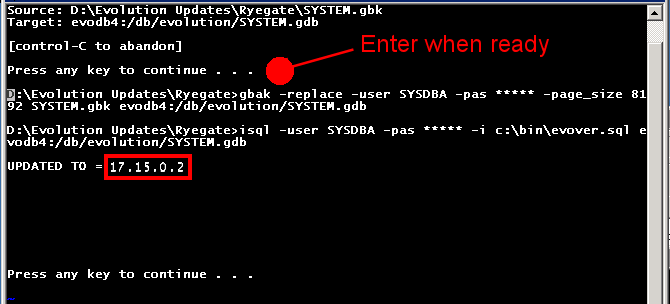
IMPORTANT: Always verify that the version is what you expect; because you can't tell from the name "SYSTEM.gbk" which exact version is inside, it's easy to slip up and restore the wrong version.
Also keep an eye out for errors in the output listing; they are usually obvious. Seek help if you see one.
Assuming all appropriate updates have completed successfully, it's time to start Evolution back up to allow the users back in.
In the past, services were started all in one click ("Start all services"), but I've found that this is not always reliable, and that starting services in a particular order works better.
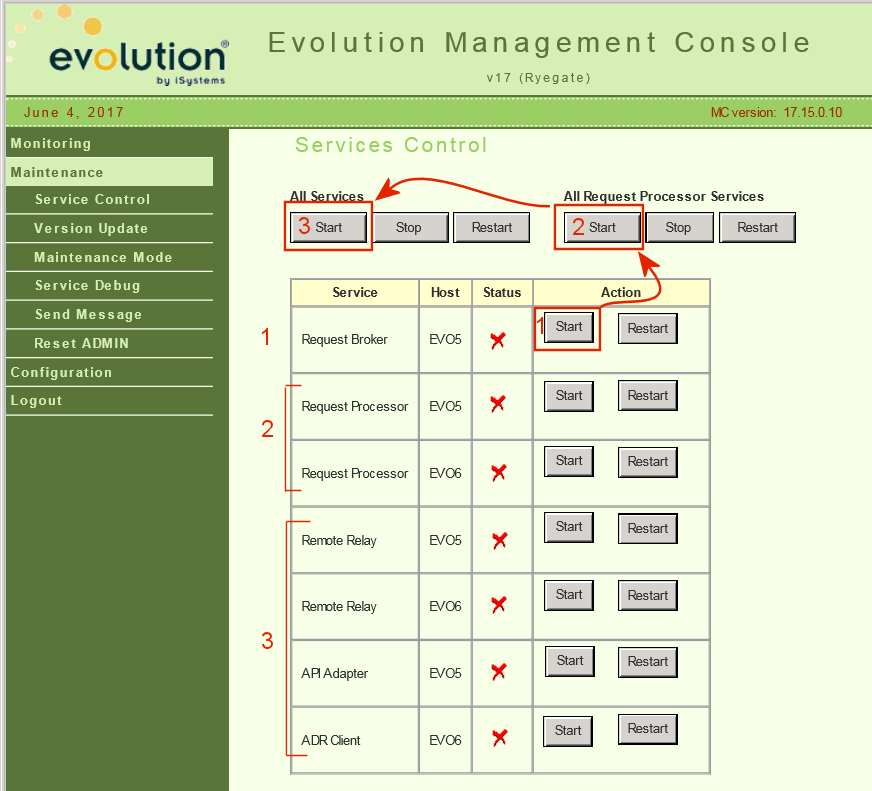
Services should be started in this order, waiting each time for the start to complete:
At this point, Evolution is now running and the update is complete!
Though the upgrade is complete, it's nevertheless wise to check your work by actually logging into Evolution to make sure it's as you expect. Launch the standard Evolution GUI client that you use every day, allow it to update itself, then login as usual.
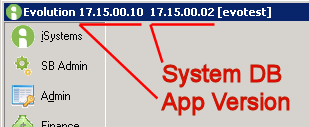
Look in the upper left of Evolution's title bar and you'll see both of the versions; these should be what you installed:
But if you make a mistake and mix-and-match versions, you (and your remote clients) will see:
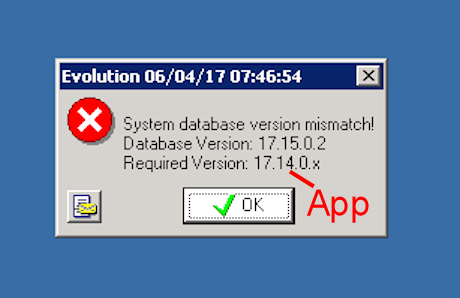
This can happen if you either forget to install the version in the Evo MC or if you install the wrong System database, and though technically Evolution might be able to limp along in this condition it really must be fixed immediately.
Looking at the error message, the upper line shows the System database version (here, 17.15.0.2), and this means it's expecting the application version to be 17.15.0.X as well, but it's actually got 17.14.0.X. In this case, obviously we forgot to activate 17.15.0.X in the Evo MC.
If this happens, stop Evolution immediately and doublecheck your work.
Installed Evolution versions always must agree in the first three numbers; there are no exceptions. If the SYSTEM database is 17.15.0.X then the application version must be 17.15.0.X.
The last digit ("X") will almost never match, but they aren't designed to. What matters are the first three numbers.
This Evo Tip is not supported or endorsed by Asure Software, Inc.
First published:
2008/11/18
Updated 2023/04/20