![[Steve Friedl Logo]](/images/unixwiz-logo-140x80.gif)
This site uses advanced css techniques
The Evolution™ payroll service-bureau software from Asure Software is updated regularly to fix bugs and to reflect changes in tax/HR law, and these updates must be applied by Evolution licensees as needed. Patches are released several times a month.
Notice of a new release is sent to the evolution-announce mailing list, and the updates themselves are posted on the support website (Asure-provided credentials required) for download. This document describes the procedure for applying these updates.
We'll note that this is not the only way to perform this task, but it's a process we've been refining for years, and has worked quite well.
Furthermore, this is only for the routine patch updates: we're not touching on the much more substantial major version upgrade procedures, which require help from IT.
Bureaus on the AWS cloud environment have their updates applied automatically by Asure.
iSystems releases two kinds of patches:
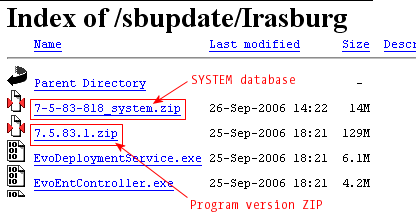 The files are found on the support site under a directory named
for the release: as of this writing, the current directory is
Irasburg/:
Because both kinds of updates require that Evolution be brought down in one form or another, these can only be done in the off hours. See the "Notifying & Booting the users section for the most elegant way to handle this.
However, the actual download process can be performed over the internet at any time in advance so the files will be ready when the update process is to be performed. There's no reason to kick the users off until both of the files have been fully downloaded from the iSystems servers.
Though it's possible to "just do the updates" as needed, doing a bit of one-time setup in advance can really streamline the process.
All of these steps are assumed to occur on the Windows middle-tier machine that runs the Version Directory Service, which is usually the same one running the Registration Daemon.
It's assumed that you're a local administrator on this machine.

Restoring a SYSTEM database to the DB server is normally done with Evolution-provide tools, but some time ago we created a system for performing one-click installation of a SYSTEM database. Once the file has been unzipped (to SYSTEM.gbk), performing a right-click on the file in Explorer provides a "Update LIVE system" choice.
It's been exceptionally helpful, and popular with a number of service bureaus: it's easily worth the time and effort to configure.
Full instructions, including plenty of screenshots, is here:
 Though we typically download the version ZIP directly to the program's
Version\ directory, the SYSTEM database updates are a different
matter.
We typically create a folder on the main machine for these updates, putting it on the D: drive to reduce the burden on the main system C: drive. This D:\Evolution Updates folder will hold the individual SYSTEM database updates, as well as the major version update files that are used once or twice a year.
Though routine updates normally involve just the one machine, major updates touch all Evo middle-tier (Windows) machines, so we share this folder as Evolution Updates on a readonly basis, and then create a desktop shortcut on the all systems pointing to it. In this manner, all systems can see the update files easily.
This shortcut should be placed on the current machine's desktop as well, because we'll be using that to quickly navigate to this directory while downloading an update.

When downloading a version ZIP, it ultimately need to go in the Versions folder of the Version Directory Service, and we typically save the file there directly from within Internet Explorer. Just dropping the file there makes it available to Evolution, but does not actually install it until explicitly told to do so by the user.
This directory is typically:
C:\Program Files\Evolution\VersionDirectoryService\Versions\
Because this is such a common download, we quickly grew tired of having to navigate through the filesystem in the "Save as" box, starting from C:\ and working our way on down.
So, we created a desktop shortcut named "Versions for LIVE System" and point it to the proper directory. We include "LIVE" in the name because we typically configure separate live/production and test Evolution systems, and we need to know which one we're updating.
Then, when clicking to save the version zip from the iSystems support site, one clicks Desktop in the Save As dialog box, then the Versions shortcut. Two clicks is a lot easier than 10.
![]() The SYSTEM db files must be uncompressed before they can be
restored into the database, and there are numerous methods
for this. Windows Server 2003 has built-in support for them,
treating a ZIP archive as a folder in Explorer, and there are
numerous third-party programs as well for Windows 2000.
The SYSTEM db files must be uncompressed before they can be
restored into the database, and there are numerous methods
for this. Windows Server 2003 has built-in support for them,
treating a ZIP archive as a folder in Explorer, and there are
numerous third-party programs as well for Windows 2000.
We have tried several of them, and strongly recommend the use (and purchase!) WinZip because it makes Evo updates easier. These patches are applied often enough that we're always on the lookout for ways to save a few clicks.
When Winzip is installed, it configures right-click handlers in Explorer, and it makes it very easy to simply unpack the file in the current directory:
Ultimately, all that matters is that the file be unpacked, and you're free to use any method you're comfortable with, but we're very happy with this one.
We urge you to purchase a registered copy of WinZip if you actually use it: support good software.
Both of these updates effectively bring down Evolution, so you'll want to make sure users (especially Evo Remote clients) are not interrupted by surprise unless it's an emergency.
Most Evolution service bureaus do not provide advance customer notice of downtime for patching, because the procedure doesn't take very long and is very low risk. This is unlike the major version upgrades, which put Evolution out of service for hours or days, and warrants an announce maintenance window.
Even though it's easy to tell when payroll staff has all checked out, there still may be customers online via Evolution Remote. Customers often work at odd hours, especially the evening before due-tomorrow payrolls.
To find out, visit the EEC with the web browser and navigate to:
Evolution Deployment Service
» Registration Daemon
»» User Pool Status
In the right-hand pane, this shows all the users currently on the system. In-house users are normally associated with their own workstation (martinpc, payclerk1, etc.), but Evo Remote clients always show up associated with the machine hosting the Remote Access Service.
We'll note that the user's status represents only whether the user has a job actively in process, not whether they're generally active. Even though it says Idle, they may well have just finished entering a payroll or updating an employee.
The only real way to find out if they're really idle is to click on their name and see the history in the rightmost pane. This shows internal processing steps (which aren't that interesting), along with the time (which is). Users with did-something time in the past are probably not actively working in Evolution.
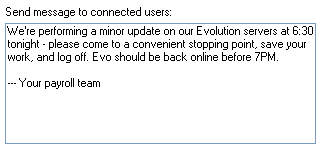 We'll note that the EEC has no way to boot an individual user session,
nor to kill sessions which are actually dead, but it's possible to send
a Maintenance Notice to all connected users.
Evolution Deployment Service
» Registration Daemon
»» Maintenance Config
A reasonable time before shutdown, enter a message in the rightmost box ("Send message to connected users"), and click Save Changes. This makes the message appear in a popup box for all users, but does not actually shut down Evolution. And as an interesting side effect, users with dead sessions will be automatically disconnected. This leaves just the "real" users behind.
When zero hour arrives, stopping the package servers fully brings down Evolution (Eve Remote users will get a message that the system is in maintenance mode).
Updating the SYSTEM database is the most common operation, as they're released more often (between 6 and 12 per month).
 Using your favorite archiving tool, extract the SYSTEM.gbk
file from the archive and save it into the that same directory.
Users who've installed WinZip can right click, select "Winzip..."
from the context menu, then select "Extract to here".
 We must stop the package servers before attempting to restore the
SYSTEM database so that they "let go" of database files. The
update process will fail if a package server has the SYSTEM db
open on the database server.
 Note: - if you're performing both upgrades, stop here
until all are completed. There is no point in restarting the package
server and testing with Evolution if the other half is not finished
yet (it will always provoke an error).
Evolution Deployment ServiceAll the package servers should appear in the list.
» Registration Daemon Service
»» PS Pool Status
These virtually always include the SYSTEM database update as shown in the previous section, so those steps are incorporated by reference.
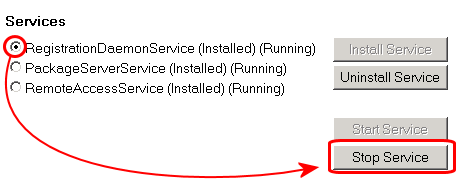 Though this is not technically required by the process, it does
make some parts of the update go a bit more cleanly internally.
Using the EEC (as above), stop the Registration Daemon and Remote
Access Services.
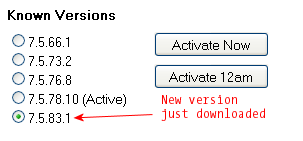 Once the file has been downloaded — it's very large, it
may take some time — visit the EEC again and navigate to
the Version Directory Service area. The right panel will contain
a list of versions that have been downloaded, and the active one
will be noted.
 As with the SYSTEM database, launch Evolution from a client workstation
and insure no version-mismatch errors occur.
It's so common to have to update both parts that we've found that doing things in a certain order is the most efficient: though it's possible to do one, and then the other, there's a lot of wasted time waiting for things to finish that can better be used by doing two things at once.
Note - this section is meant to be a guide that augments the previous sections, but only once the individual steps are well understood.
This Evo Tip is not supported or endorsed by iSystems, LLC.
First published: 2006/09/29